English
 عربى
عربى Español
 Français
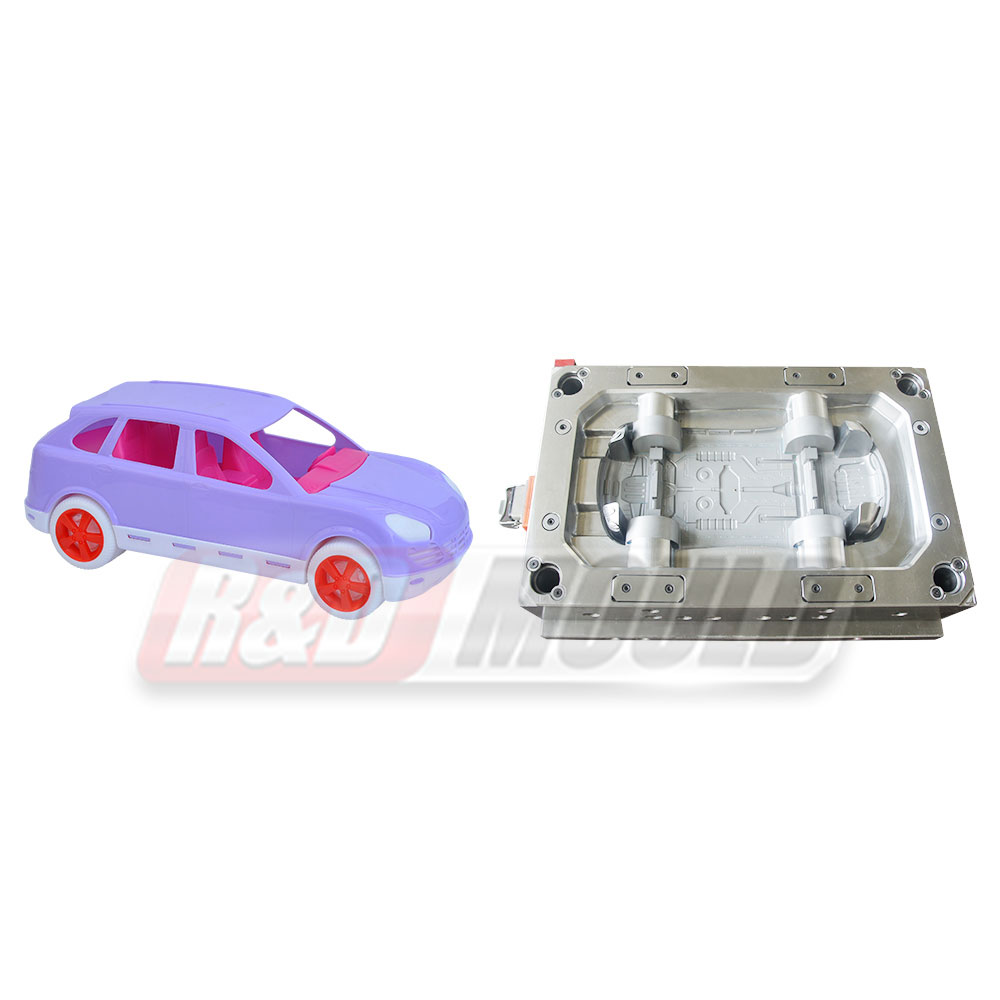
Automotive Mould Design and Production: What Matters for Efficiency, Materials, Quality and Complex Parts
In today's automotive manufacturing world, moulds sit right at the center of turning raw materials into the actual parts that make vehicles work. You know, everything from dashboard panels and bumper covers to those under-hood components—how these moulds are designed and built can quietly shape how the entire production line runs day after day. Factories and suppliers are always hunting for practical ways to keep costs steady, hold output levels consistent, and manage the growing mix of shapes that modern car designs throw at them. So in this article, we're going to walk through six areas that keep popping up whenever people talk about automotive moulds. We'll look at how it design ties into manufacturing efficiency, the materials that are commonly in use these days, some real-world tips for cutting down on waste, ways to catch quality hiccups early in a project, why cooling systems deserve a closer look during the design phase, and the features that help handle those more complex part shapes.
These topics aren't just theory—they matter because every automotive it project moves through several connected stages, and a choice made at the beginning often shows up again later on in ways you might not expect at first. A smart design decision or the right material pick can help keep things moving without extra headaches down the line. By breaking it all down step by step, engineers, procurement folks, and plant managers can get a clearer sense of what to watch for in their own setups. The points here come straight from standard industry practices and are meant to give a straightforward, balanced view that actually helps with day-to-day decisions. Whether the work involves plastic injection moulding or any of the other common forming methods used in vehicle assembly, the same core ideas tend to apply across different operations.
Before we jump into the details, it's helpful to remember that these elements don't stand alone. They overlap in ways that affect everything from the first prototype to full-scale runs. With that in mind, let's start with the first area and see how it all connects in practice.
How Automotive Mould Design Affects Car Manufacturing Efficiency
It design really does set the rhythm for how smoothly an automotive production line performs once everything is up and running. The arrangement of cavities, the placement of gates, and the way the ejector system is laid out all feed into how long each cycle actually takes in practice. When the whole setup lines up well with the press and the part geometry, the process tends to flow along with fewer mid-run adjustments or unexpected stops. For example, a balanced runner system spreads material more evenly, which often leads to steadier filling and less need to keep tweaking settings once production is rolling along nicely.
On top of that, engineers usually spend time fine-tuning draft angles and keeping wall thicknesses uniform because those small details make a noticeable difference in how easily parts release from the cast. Good draft reduces the force needed for ejection and lowers the odds of sticking or warping. In a high-volume plant, even modest gains in release behavior can add up across thousands of cycles, helping the line stay on pace without frequent pauses for cleaning or spot checks. That brings me to another practical side of things: how does it work alongside automation equipment. Locating rings and clamp slots need to match the machine specs so changeovers don't drag on longer than necessary. When the cast sits properly in the press, job swaps happen more predictably, which makes shift scheduling feel a lot less stressful for everyone involved.
Teams also look closely at cavity count in relation to the available clamp tonnage. A design that uses the press force effectively helps steer clear of under-packing or flash, both of which would otherwise create extra trimming or rework later in the line. Before moving on, it's worth noting that flow analysis during the early design phase often serves as a useful checkpoint. It highlights spots where material might hesitate or where weld lines could show up, giving designers a chance to adjust gate positions while changes are still fairly simple. In real shop settings, most teams compare simulation results with actual trial shots to confirm the cast behaves as expected once it's under full production pressure.
Shifting gears a bit, maintenance access also plays a bigger role in long-term efficiency than it might first appear. casts that let technicians reach wear items like slides or inserts quickly mean routine servicing doesn't bring the line to a halt for hours at a time. Proper venting placement, for instance, lets air escape during filling and cuts down on burn marks or short shots. These smaller touches might not seem flashy, but they add up when the line is running around the clock. All of this leads to one clear takeaway: the design phase really does shape how the cast fits into the larger manufacturing picture. Teams that pay attention to these points early on usually see more predictable performance from batch to batch, which lines up nicely with the tight delivery schedules that automotive supply chains demand.
What Materials Are Used in Automotive Mould Production Today
Choosing the right material for an automotive cast comes down to striking a practical balance between strength, machinability, and how well it handles heat over time. Steel remains a common pick in many cases because it holds fine surface details after polishing and offers reliable durability for the volumes most programs call for. Different grades give producers room to adjust hardness and corrosion resistance, so they can match the material to the resin type and the expected run length without overcomplicating things.
That said, aluminum alloys often enter the conversation when quicker heat transfer would be helpful. They're lighter to move around during installation and tend to machine faster, which can shorten the time it takes to get the cast ready for trials. Their wear characteristics differ from steel, of course, so they usually get considered for programs that sit in the moderate-volume range rather than nonstop high-output lines. Another angle worth mentioning is the use of certain tool steels with added alloys for toughness. These grades support the sharp edges and tight tolerances that many automotive parts require. Surface treatments such as nitriding or simple coatings are sometimes applied afterward to extend service life without dramatically altering the base properties.
Copper alloys, meanwhile, show up in spots that need fast cooling—think inserts placed near thicker sections of the part. Their ability to pull heat away quickly can help create more even solidification across the cavity. Producers weigh the added cost of these inserts against the steadier cycles they can deliver, making the decision on a case-by-case basis. Before we leave this section, surface finish requirements also guide material choices in important ways. Some parts call for a smooth, glossy look while others need texture for better grip or style. The base material has to respond well to polishing or texturing so the finish transfers cleanly to every shot.
Beyond the main cavity and core plates, moving components like slides, lifters, and guide pins rely on materials chosen for smooth, repeated motion. Making sure these parts work well together helps limit galling and keeps the mould reliable over time. Most teams review material data and past job records when quoting new builds so everyone starts with a shared picture of expected performance and maintenance needs. By thinking through these material factors at the quoting stage, both the mould maker and the customer can plan more confidently for the long haul, which is exactly why this topic keeps coming up in project discussions.
Tips for Reducing Waste in Automotive Mould Operations
Cutting waste in automotive mould operations often boils down to steady, everyday habits rather than one big dramatic change. One area that usually pays off quickly is dialing in process parameters—injection speed, pressure, and temperature—so they line up closely with the material's flow behavior. When settings sit near that sweet spot, short shots and flash become less common, which means fewer parts end up as scrap. Operators typically run a handful of trial cycles, log the data, and settle on a stable window that keeps rejects low.
On top of that, scheduled cast cleaning makes a real difference. Removing residue from vents and cooling channels before it builds up helps keep performance consistent from shift to shift. When channels stay clear, heat moves more evenly and the chance of warpage or sink marks drops, so fewer parts get pulled off the line for rework. Material handling counts as well. Keeping resin dry and free of contamination before it reaches the hopper supports better melt quality and reduces voids in the finished part. Simple steps like using sealed hoppers and checking moisture content regularly go a long way toward avoiding processing headaches that lead to extra scrap.
Shifting focus for a moment, runner and gate design also influence waste levels in noticeable ways. Keeping the feed system volume in proportion to the part size means less excess material is left over after each cycle. In some applications cold runners can be reground and reused if the material properties hold up after reprocessing. Hot runner systems can limit scrap even further by keeping material molten between shots, though they do require steady temperature control to avoid degradation. Another practical step involves monitoring energy use during runs. It can highlight small adjustments—such as shortening cooling time once the gate has sealed—that lower consumption without hurting part quality. When it reaches stable temperatures quickly, the energy needed per part tends to decrease. Reviewing cycle logs helps teams spot patterns and make those minor tweaks that add up over weeks and months.
Finally, clear documentation of setup procedures ensures every shift starts from the same reference points, cutting down on variability and the trial-and-error that creates extra scrap. Operator training reinforces these routines so the whole team works the same way. Tracking scrap rates by part number and shift also lets supervisors focus attention where variation is highest. When these habits are followed consistently, the line produces more good parts with less material and labor waste. The goal stays simple: reliable, repeatable practices that fit naturally into daily operations.
How to Identify Quality Issues in Automotive Mould Projects Early
Spotting quality issues early in an automotive mould project can keep timelines realistic and avoid bigger fixes later on. It usually starts with a careful review of the part drawings and tolerance callouts before any steel is even ordered. Comparing the proposed mould concept against the component specs often reveals small mismatches in wall thickness, draft angles, or feature placement that could cause trouble down the road.
Before moving forward, prototype samples from soft tooling or 3D-printed inserts give the team an early look at how the material fills and how stable the dimensions turn out. A quick visual check plus basic measurements can highlight knit lines, air traps, or areas that might warp. These early findings let designers tweak gate locations or add vents while changes are still fairly straightforward. During the design validation phase, engineers go over the assembly drawings to confirm that moving components line up properly. Interference checks and tolerance stack-ups help ensure slides and lifters will move without binding. Catching any issues here means adjustments can be made before the build gets too far along.
Once the production mould is on the press, trial runs become another important checkpoint. Short shots and progressive fill studies show exactly how the cavity fills and where hesitation might occur. Dimensional data from these first parts is measured against the print to spot shrinkage or warpage trends. At that point the team can still adjust cooling channels or processing conditions while the mould is still accessible. Surface quality checks are part of the routine as well. Good lighting and a simple magnifier often reveal flow marks, blush, or texture inconsistencies that might not show under normal shop lights. When those appear, the group can look at polishing levels or venting before full production starts.
Keeping records of every trial—including photos and measurement sheets—creates a useful reference set for later troubleshooting. With a clear baseline, it becomes easier to tell normal variation from a developing problem. That information comes in handy when volumes increase or the mould moves to another facility. Putting upfront analysis, sample evaluation, and structured trials together gives everyone involved a better handle on risks and a chance to address them while time and budget are still under control.
Why Proper Cooling Systems Matter in Automotive Mould Design
Cooling systems play a quiet but important role in how heat leaves the moulded material, which directly affects cycle time and part consistency. Channels placed close to the cavity surfaces pull heat away at a controlled pace so the part solidifies evenly. When cooling is uneven, thicker sections may stay hot longer than thin walls, creating internal stresses that show up as sink marks or slight dimensional shifts.
Designers often route cooling lines to follow the part contour for more balanced temperature distribution. Parallel or series layouts are chosen based on geometry and available water flow. Baffles or bubblers in deep cores make sure coolant reaches areas that would otherwise trap heat. That leads to another point: temperature control units keep the coolant within a steady range, which helps every cycle behave the same way. Consistent mould temperatures reduce condensation on cavity surfaces and let the material reach ejection strength at the right moment. In the shop, teams usually check inlet and outlet temperatures to confirm the system is doing its job.
Channel diameter and spacing need to balance heat transfer with the structural strength of the mould plates. Enough steel between channels prevents bowing under clamp force while still allowing effective cooling. These details are reviewed during the engineering phase so the final layout works well without compromising durability. In multi-cavity moulds, equal cooling across all cavities supports uniform part quality. Manifolds that deliver similar flow to each circuit help achieve that balance. If one cavity runs noticeably warmer or cooler, simple valve or routing adjustments can bring things back in line.
Routine maintenance, such as flushing channels to clear scale or debris, keeps the intended heat transfer rate steady. Clear passages prevent unexpected changes in cycle performance over the life of the mould. Most teams build these checks into their regular service schedule. Paying attention to cooling design therefore helps maintain stable production conditions and supports parts that meet dimensional requirements with less variation from shot to shot.
Which Automotive Mould Features Help with Complex Part Shapes
Many automotive parts now include undercuts, ribs, bosses, and varying wall thicknesses that need special mould features to form properly. Slides and lifters provide the movement needed to release these shapes without damaging the part or the tool. Their timing and stroke are coordinated with the press opening so everything clears smoothly.
Collapsible cores offer a solution for internal threads or detailed internal features. These cores fold inward during ejection, freeing the formed details so the part drops out cleanly. Their design accounts for material shrinkage and the forces involved in collapse and reset. Fixed and moving inserts allow localized changes in cavity detail or even different material types within one shot. They can simplify multi-material parts or provide replaceable surfaces in high-wear zones. Good seating and alignment keep tolerances tight where the insert meets the main cavity.
For parts with hollow sections or thick ribs, gas-assist or water-assist channels may be added. These introduce a secondary medium that displaces material in chosen areas, reducing sink and weight while keeping structural strength. Entry-point placement is planned carefully to avoid surface marks on the finished part. Texturing and surface details on the cavity walls transfer directly to the component, delivering the required appearance or grip. The mould material and polishing process must support the texture depth so it stays consistent across the entire production run.
Draft angles and shut-off surfaces are adjusted to suit the complex contours without creating flash or binding when the mould closes. Simulation helps confirm that all the chosen features will work together without interference. When these elements are integrated carefully, the mould can produce parts that match the intended geometry while keeping the overall process manageable. Feature selection ultimately depends on the specific shape requirements and the program's volume expectations.
The six topics we've covered—mould design and its effect on efficiency, material choices, practical waste-reduction tips, early quality detection methods, cooling system considerations, and features for complex shapes—work together to shape how automotive mould projects actually unfold. Each decision made during planning or production carries through to later stages, from the first trial shots all the way to full-scale output. Looking at these areas in a connected way encourages a more complete approach instead of chasing separate fixes.
Production teams that keep these principles in mind across design, material selection, and daily operations often find their processes run more predictably. The points shared here can serve as a handy reference for anyone reviewing current mould programs or putting together specifications for new ones.
As a professional automotive mould manufacturer, we offer design consultation and production support that fits the needs of each individual project. Our team collaborates with customers to review requirements and develop mould solutions that align with their manufacturing goals. If you'd like more information or want to talk through a specific application, feel free to reach out through the contact details on our website or use the inquiry form below. We're here to help with your next automotive component program.